How to Create a Diy Hanging Shelf?
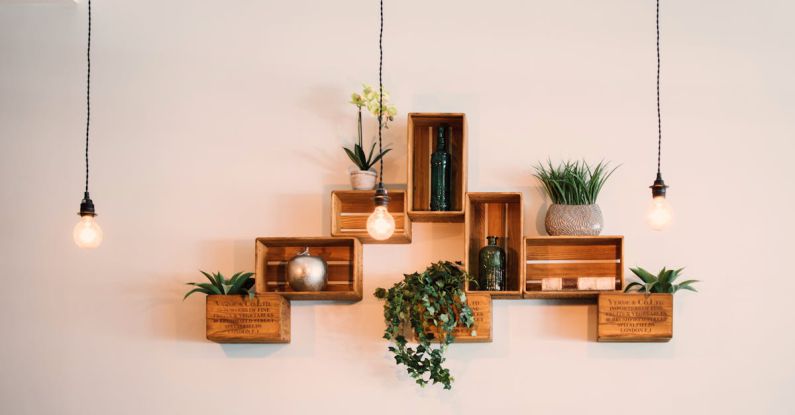
Looking to add a touch of creativity and functionality to your living space? A DIY hanging shelf might just be the perfect project for you. Not only does it provide a practical storage solution, but it also serves as a unique decorative element that can showcase your personal style. With a few simple materials and a bit of creativity, you can easily create your own DIY hanging shelf to enhance any room in your home.
Materials Needed
To get started on your DIY hanging shelf project, you will need a few basic materials that are easy to find at your local hardware store or craft shop. Here’s what you will need:
– A wooden board or plank: Choose a piece of wood that fits the size and style you desire for your shelf.
– Rope or twine: Opt for a sturdy rope or twine that can support the weight of the shelf and its contents.
– Drill and drill bits: A drill will be essential for creating holes in the wood to attach the rope.
– Screws: Choose screws that are appropriate for the thickness of your wooden board.
– Level: To ensure that your shelf hangs straight, a level will come in handy.
– Paint or stain (optional): If you want to add a pop of color or customize the look of your shelf, consider using paint or stain.
Choosing the Right Wood
When selecting a wooden board for your DIY hanging shelf, consider both the aesthetic appeal and functionality of the wood. Pine, oak, or birch are popular choices for their durability and versatility. You can choose a natural finish for a rustic look, or paint the wood to match your existing decor. Make sure to sand the edges and surface of the wood to create a smooth finish before moving on to the next step.
Assembling the Shelf
Begin by measuring and marking the points where you will drill holes in the wooden board to attach the rope. Ensure that the holes are evenly spaced and aligned to maintain balance when the shelf is hung. Use a drill bit that is slightly larger than the diameter of the rope to create clean, precise holes.
Next, cut the rope into four equal-length pieces, depending on how long you want your shelf to hang. Thread each piece of rope through the holes in the wooden board, and tie secure knots at the ends to prevent the shelf from slipping off. Adjust the length of the rope as needed to achieve the desired height for your hanging shelf.
Hanging the Shelf
Before hanging your DIY shelf, use a level to ensure that it will be straight once mounted. Locate a sturdy anchor point on the wall or ceiling where you want to hang the shelf. Use screws to attach the rope to the anchor point securely, making sure that the shelf is level and secure.
Personalizing Your Shelf
Get creative with how you style and decorate your DIY hanging shelf. Consider adding small potted plants, framed photos, or decorative objects to personalize the look of the shelf. You can also experiment with different rope colors or textures to complement your overall decor scheme.
Final Touches and Maintenance
Once your DIY hanging shelf is in place, step back and admire your handiwork. Remember to regularly check the shelf’s stability and make any necessary adjustments to ensure it remains securely mounted. Dust the shelf regularly to keep it looking fresh and clean, and enjoy the functional and aesthetic benefits it brings to your space.
Elevate Your Space with a DIY Hanging Shelf
By following these simple steps and unleashing your creativity, you can create a stunning DIY hanging shelf that adds character and functionality to any room in your home. Whether you’re a seasoned crafter or a beginner looking to try your hand at a new project, this DIY endeavor is sure to impress and inspire. So gather your materials, roll up your sleeves, and get ready to elevate your space with a stylish and practical hanging shelf that reflects your unique style and personality.